Publishing and Exporting > Publishing Flash movies
Publishing Flash moviesPublishing a Flash movie on the Web is a two-step process. First, you prepare all required files for the complete Flash application with the Publish Settings command. Then you publish the movie and all its files with the Publish command. To prepare Flash content for use in other applications, you use the Export command; see Exporting movies and images.
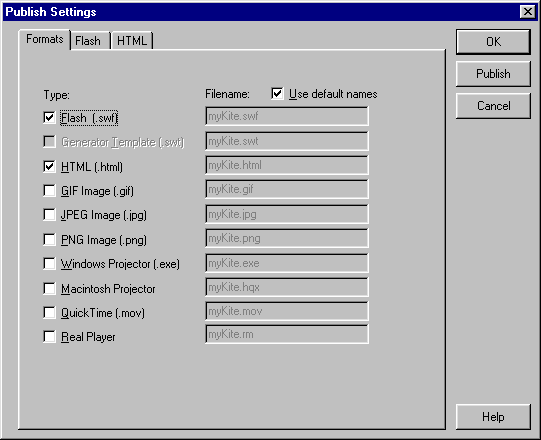
The Publish Settings command lets you choose formats and specify settings for the individual files included in the movie—including GIF, JPEG, or PNG—and then store these settings with the movie file.
Depending on what you specified in the Publish Settings dialog box, the Publish command then creates the following files:
| The Flash movie for the Web (the SWF file). | |
| Alternate images in a variety of formats that appear automatically if the Flash Player is not available (GIF, JPEG, PNG, and QuickTime). | |
| The supporting HTML document required to display a movie (or an alternate image) in a browser and control browser settings. | |
| Stand-alone projectors for both Windows and Macintosh systems and QuickTime videos from Flash movies (EXE, HQX, or MOV files, respectively). |
To alter or update a Flash Player movie created with the Publish command, you must edit the original Flash movie and then use the Publish command again to avoid discarding any authoring information. Importing a Flash Player movie into Flash strips some of the authoring information.
To set publishing options for a Flash movie's files:
| 1 | Specify where you will publish the Flash movie files: |
| Create the folder where you want to save the published files, and save your Flash movie file. | |
| Browse to and open an existing folder, and save your Flash movie file. | |
| 2 | Choose File > Publish Settings. |
| 3 | Select the option for each file format you want to create.

|
| The HTML format is selected automatically, because an HTML file is required to display your Flash movie in a browser. In addition, if the selected format has settings, a corresponding tab appears above the current panel in the dialog box. Choosing an image format such as GIF, JPEG, or PNG automatically adds the required HTML code to display the image if the Flash Player is not available. | |
| For more information on publishing settings for individual file formats, see the sections that follow. | |
| 4 | For Filename, choose from the following options: |
| Use the default file names. | |
| Deselect Use Default Name. Then enter your own file name. | |
| You can browse to where you will publish the files and publish each file in a different location (for example, if you want to save the SWF file in one location and the HTML file in another location). On Windows, use backslashes to specify the directory/folder/file hierarchy; on the Macintosh, use colons (:). For a relative path, use ..\to indicate the path to the hard drive; for an absolute path, specify the drive name. For example: | |
For example, in Windows, specify an absolute path as C:\Folder\filename.swf where C: is the drive name, \Folder specifies the folder name, and filename.swf is the name of the file. |
|
On the Macintosh, specify an absolute path as HardDrive name:Folder:filename.swf. |
|
| 5 | To create a projector, select Windows Projector or Macintosh Projector. |
| Although you can create a Macintosh projector using the Windows versions of Flash, you must also use a file translator such as BinHex to make the resulting file appear as an application file in the Macintosh Finder. The Windows version of Flash names a Macintosh projector file with the .hqx extension. | |
| 6 | Enter a unique name for Filename, or select Use Default Name to create each file using the Flash file's name with the extension appropriate for that format. |
| 7 | Click the tab for the format options you want to change. Specify publish settings for each format, as described in the following sections. |
| 8 | When you have finished setting options, do one of the following: |
| To generate all the specified files, click Publish to generate all the specified files, or click OK. | |
| To save the settings with your file and close the dialog box without publishing, click OK. | |
To publish a Flash movie:
| 1 | If necessary, set the publishing options for the files, as described in the previous procedure. |
| 2 | Choose File > Publish to create the files in the formats and location specified in the Publish Settings dialog box. |